
Recently my company wanted to use the Apply with LinkedIn feature on one of our ATS modules. This feature allows the applicant who want to apply for a job posting to fill the application form using their LinkedIn data. This saves them time by receiving their info from LinkedIn and filling the form instead of filling the form themselves.
Apply with LinkedIn is a feature available from LinkedIn as part of their enterprise products. This specific feature can help us increase the ease of applying to an offer by providing user’s data to third party applications. Here I will explain what is necessary to integrate this feature into our system on a more granular level.
But this feature is not open for use to everyone. Also in order to receive the information and fill the form you will need to use the LinkedIn APIs. We create our customer applications through their APIs and then we can use their Javascript Widget. In this post I’m going to share what I’ve learned implementing this feature. We also going to see how we can use the APIs. Also other problem that might arises while we try to use this feature. Hopefully this information can be useful to you if you or your company wanted to use this feature.
Let’s Define a Few Terms
There are a few terms that is used quite heavily in LinkedIn APIs documentation. I think it’s better to explain what they mean before I start explaining how to use the APIs. Hopefully by knowing these terms thing make more sense when I try to explain the usage. The reason is that the current documentation is not very clear. Also sometimes they use terms interchangeably which makes it even more confusing at times.
Provisioning API
We need to implement the apply with LinkedIn feature on customer by customer basis. This API that allows us to do that is called Provisioning API. We do that by creating a LinkedIn application per customer. Then It associate client_id and client_secret and key to each customer which we’ll then use in the LinkedIn page. To be able to use this API we need the correct authorization which will be explained later.
Client Credential Flow (2-legged OAuth)
In this type of authentication the user is not involved in the authentication process. The agreement to use the data is made between the provider of the API (LinkedIn) and the consumer of the API which is our application. This is the type of authentication that we’re going to use to integrate the Apply with LinkedIn feature.
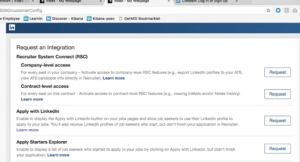
ATS Integration Configuration Plugin
This plugin allows our users to enable the apply with LinkedIn features. There are a set of options that we can activate for a customer. Options are the ones that are activated for our global account.
Api Key/Client Id/Consumer Key
In the documentation all of these terms means the same thing, I mention it here only for disambiguation.
Acquiring access token to use the provisioning API
The first step required for using the APIs is to create a valid application on LinkedIn. This application is created by the LinkedIn team after you’ve become a LinkedIn partner. We need this clientId and clientSecret to acquire an access token. We then use access token in order to be able to use the provisioning API. To get an access token we need to login with a LinkedIn account that has apply with LinkedIn product enabled on it. For an ordinary user this product is not available. We should fill the necessary forms and make request to LinkedIn. Assuming that we have access to this account we can create an application through this create a new application link. This application is used for the entire solution to create customer specific applications using provisioning API.
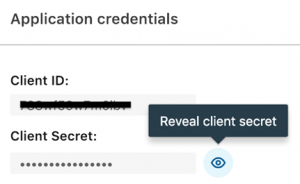
After creating the application we receive a client_id and client_secrert necessary to make the call and get the access token.
Then we make a request to this URL with grant_type, client_id, client_secret included in the body of the post as delineated by this article.
Using the Provisioning API to create applications on behalf of the customer
In previous step, we’ve created an application that will be used to get an access token to use with provisioning API. Now we can use this access token to create an application for the customer using this link.
We need to pass, a unique Id and description to this end point. There are also some optional fields which can be filled. For more info visit create application link.
After making the request if it was successful we receive a response containing the client_id, client_secret. These info are needed to use with the ATS Integration Configuration Plugin. After making a successful request the response body will look like something like this.
Displaying the customer configuration plugin
In this step we show the configuration plugin per customer basis. Remember we have created an application per customer using the provisioning API. In this step we use those information by including them inside the script tag as shown below.
Here we use the API keys that we received from the previous step and handleIntegrations as callback function. When the customer decides to activate certain aspect of the plugin, this callback will be called . Which in this case in apply with LinkedIn. Then the customer information is passed down it a function that we specified in the script. The information passed into this callback function for arguments are.
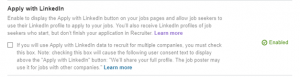
When customer decides to enable the apply with LinkedIn feature we receive some information including the integration context. This integration context stays the same for all the customers and it’s on an organization level. The thing that distinguishes each customer is the client_id which we received when we create a new application for the customer using the provisioning API.
Activating the customer integration after it made a request
After client decided to enable the apply with LinkedIn feature, we need to also make an API call. This call is to update our customer integration status. Basically we need to make a post request to this end point specifying our query string parameter like so.
Also we need to specify the customer integration name in the body of the request.
It is important to note that the distinguishing factor between customers when calling the this end point is the access token. We got this by using the customer’s client_id and secret as opposed to the (application level) ones. So we need to make a request to the below endpoint receiving the customer token. Then using the customer client_id and secret. We should use this link.
After making a request to this endpoint we can see that the integration status changes from Notify partner (requested).
![]()
To enabled.
So far we have created an application on LinkedIn which is going to be used globally. We used this application to get an access token that allows us to use the provisioning API. Then we used the provisioning API to create an application for our customer and also received a client_id and client secret. We did that after creating an application for our customer. Then we used that client_id to display the integration configuration plugin. At this point if the customer decides to activate the apply with LinkedIn feature, we receive an integration context. Then we made a request to another API to activate the customer integration. Now we are ready to actually integrate the Apply with LinkedIn button on our page. By using the information gathered form previous steps.
Integrate the apply with LinkedIn button on our offer page
In this step we integrate the Apply with LinkedIn plugin on our page. The first step is to make sure that the JS resources is listed as a trusted resource. This step is accomplished when we created an application using the provisioning API. We should specify the valid domains for the argument validJsSdkDomains.
The next step is to initialize the plugin by referencing the necessary resources from LinkedIn on our page.
Then we can include the Apply with LinkedIn widget itself.
As shown above, we are using the integration context that we’ve received when the customer activeate the plugin in the configuration section. Also the api-key (client_id) which we received for the customer through the provisioning API. The data-company-job-code attribute is a the unique id associated with each job offer in our application. LinkedIn going to use this id to identify and track the job offer. The data-allow-sign-in if set to true, cause the plugin to show the Sign in to LinkedIn if the user’s cookie is not found, but if specified as false no button will be shown if no cookie related to LinkedIn have found for the user.
Apply with LinkedIn : Different Application Flows
There are couple of uses cases that we can see in the documentation. I used the “Standard flow” in this sample app. The standard flow consist of applicant sees the application form along with apply with linked in button. It clicks the apply with LinkedIn button and its information is provided via LinkedIn. We fill the form we with the provided information. Finally user clicks the submit button. At this point the process is complete.
From the technical stand point what happens is we receive the necessary information through the callback function specified for data-callback-method. The value passed into it will change depending on what kind of data mode we have chosen. For example for Button_Data mode we might do something like this to fill the page inputs with received information.
After we filled the form using the above mechanism, we can then go on and show the confirmation page. We also need to include this script in our confirmation page for LinkedIn confirmation tracking to work.
Preparing the Certification video for LinkedIn
To ensure both the Apply with LinkedIn integration and the Middleware Platform integration (the Customer Onboarding Widget and Provisioning API) work as expected, LinkedIn must certify the finished development.
We need to prove the following to LinkedIn with this video.
- Configuration plugin is working properly.
- We successfully receive the integration context when the customer activate the feature.
- We need to show the whole flow working correctly. That means the apply with LinkedIn buttons is visible on the page or sign in button depending on the user’s cookie.
- if we are using the conversion mode, we need to show that the tracking event is fired correctly.
Sample app
I’ve also created a sample application that can be cloned here. You’re going to needed your own customer ClientId for it to work. There’s also the sample from Microsoft that might give you more clue.The Microsoft sample can be downloaded here.
Things to Watch out For
There are a few things that might happen when we try to implement the features that might not be under our control. But we need to pay attention to those because of the nature of a third party integration.
- In order to be able to show the configuration plugin of LinkedIn, the user need to obtain a privileged account. We can get this type of account from LinkedIn.
- One of the problems that might happen a lot is that the user for whatever reason tries to load the plugin on a different domains. So make sure that it’s absolutely clear that this feature will not going to work in that case. We need to use a domain that the LinkedIn app is created with.
- The plugin might behave differently in terms of authentication in different browsers. As of the date of this article it works with all the major browsers, but certain browsers (IE, Edge) might behave differently.
Summary
In this post I discussed how we can use the Apply with LinkedIn feature. We saw how to use the LinkedIn API to receive the user’s information and incorporate them into our application. If you had any question or comment to hesitate to put a comment down below.